
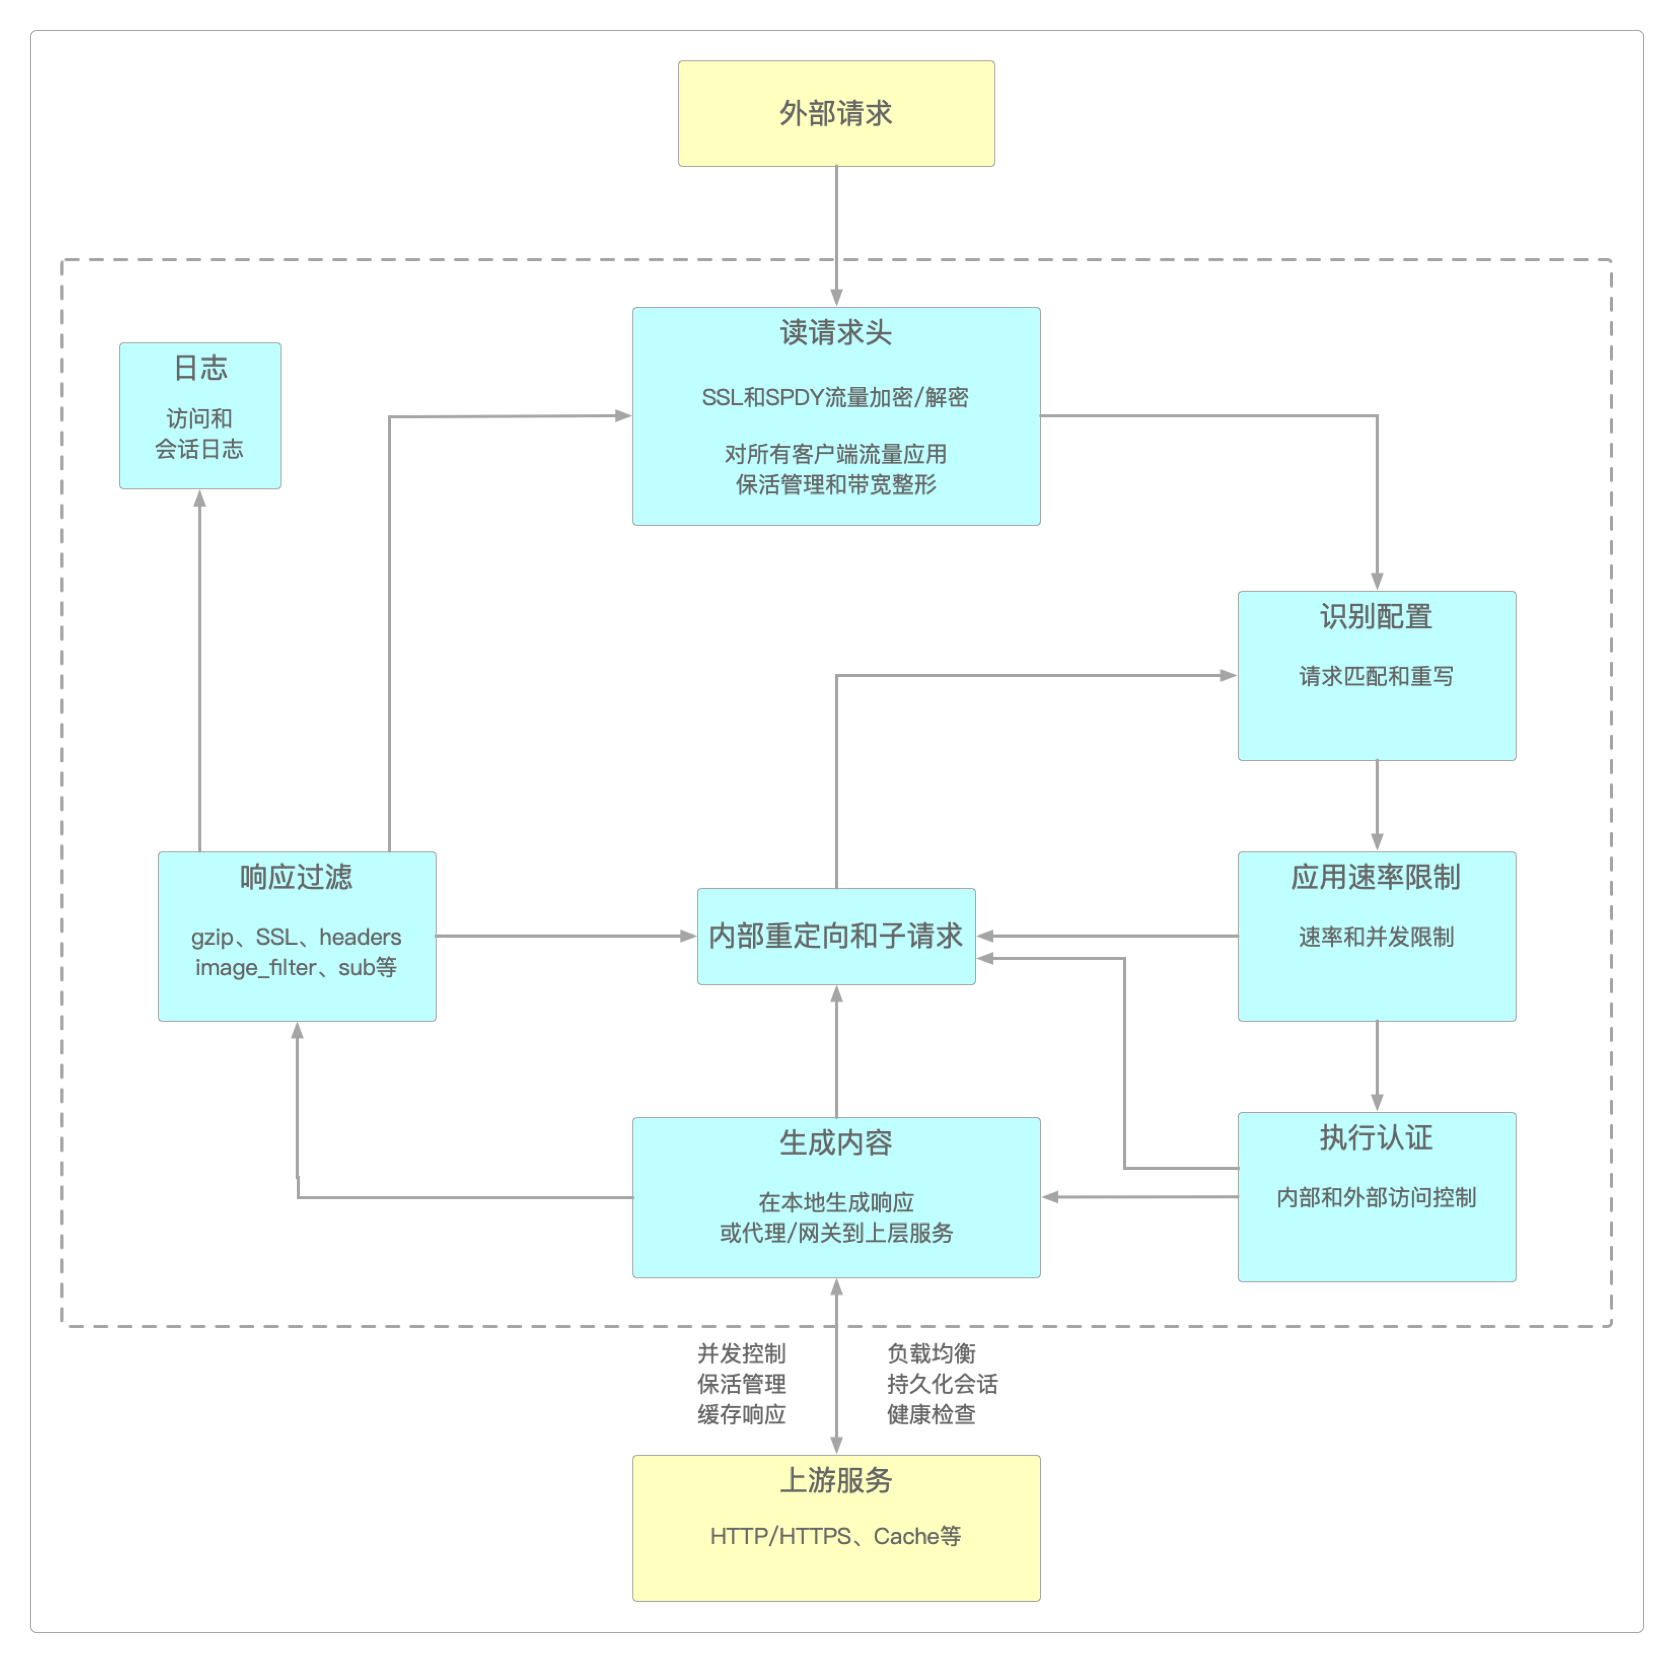
模块处理流程
执行阶段
Nginx是一种基于声明性配置的HTTP服务器,它把请求处理的过程划分成了十一个阶段。
| 顺序 | 名称 | 说明 | 加载模块 |
|---|---|---|---|
| 1 | NGX_HTTP_POST_READ_PHASE | 第一个阶段,ngx_http_realip_module在此阶段注册其处理程序,以便在调用任何其他模块之前替换客户端地址 | ngx_http_realip_module |
| 2 | NGX_HTTP_SERVER_REWRITE_PHASE | 重写服务器块(但在定位的块之外)中定义的指令,ngx_http_rewrite_module在此阶段安装其处理程序 | ngx_http_rewrite_module |
| 3 | NGX_HTTP_FIND_CONFIG_PHASE | 根据请求URI选择location的特殊阶段。在此阶段之前,相关虚拟服务器的默认location被分配给请求,任何请求location配置的模块都会收到默认服务器location的配置。此阶段为请求分配一个新的location。在此阶段无法注册其他处理程序 | |
| 4 | NGX_HTTP_REWRITE_PHASE | 与NGX_HTTP_SERVER_REWRITE_PHASE阶段相同,但用于在上一阶段选择的location中定义的重写规则 | ngx_http_rewrite_module |
| 5 | NGX_HTTP_POST_REWRITE_PHASE | 特殊阶段,如果请求的URI在重写过程中发生变化,则将请求重定向到新location。这是通过再次发送NGX_HTTP_FIND_CONFIG_PHASE请求来实现的。在此阶段无法注册其他处理程序 | |
| 6 | NGX_HTTP_PREACCESS_PHASE | 不同类型处理程序的通用阶段,与访问控制无关。标准Nginx模块ngx_http_limit_conn_module和ngx_http_limit_req_module在此阶段注册其处理程序 | ngx_http_limit_conn_module、ngx_http_limit_req_module |
| 7 | NGX_HTTP_ACCESS_PHASE | 验证客户端是否有权发出请求的阶段。标准Nginx模块,如ngx_http_access_module、ngx_http_auth_basic_module和ngx_http_auth_request_module在此阶段注册其处理程序。默认情况下,客户端必须通过在此阶段注册的所有处理程序的授权检查,请求才能继续到下一阶段。如果任何阶段处理程序授权客户端,则可以使用confuse指令来允许处理继续进行 | ngx_http_access_module、ngx_http_auth_basic_module、ngx_http_auth_request_module |
| 8 | NGX_HTTP_POST_ACCESS_PHASE | 处理满足任何指令的特殊阶段。如果某些访问阶段处理程序拒绝访问,并且没有明确允许访问,则请求已完成。在此阶段无法注册其他处理程序 | |
| 9 | NGX_HTTP_TRY_FILES_PHASE | 在生成内容之前调用处理程序的阶段。标准Nginx模块,如ngx_http_try_files_module和ngx_http_mirror_module在此阶段注册其处理程序 | ngx_http_try_files_module、ngx_http_mirror_module |
| 10 | NGX_HTTP_CONTENT_PHASE | 正常生成响应的阶段。在此阶段,多个Nginx标准模块注册了它们的处理程序,包括ngx_http_index_module或ngx_http_static_module。它们按顺序调用,直到其中一个产生输出。也可以在每个location设置内容处理程序。如果ngx_http_core_module的location设置了处理程序,则将其称为内容处理程序,并忽略在此阶段安装的处理程序 | ngx_http_index_module、ngx_http_autoindex_module、ngx_http_concat_module |
| 11 | NGX_HTTP_LOG_PHASE | 执行请求日志记录的阶段。目前,只有ngx_http_log_module模块在此阶段注册其处理程序以进行访问日志记录。在释放请求之前,日志处理程序在请求处理的最后被调用 | ngx_http_log_module |
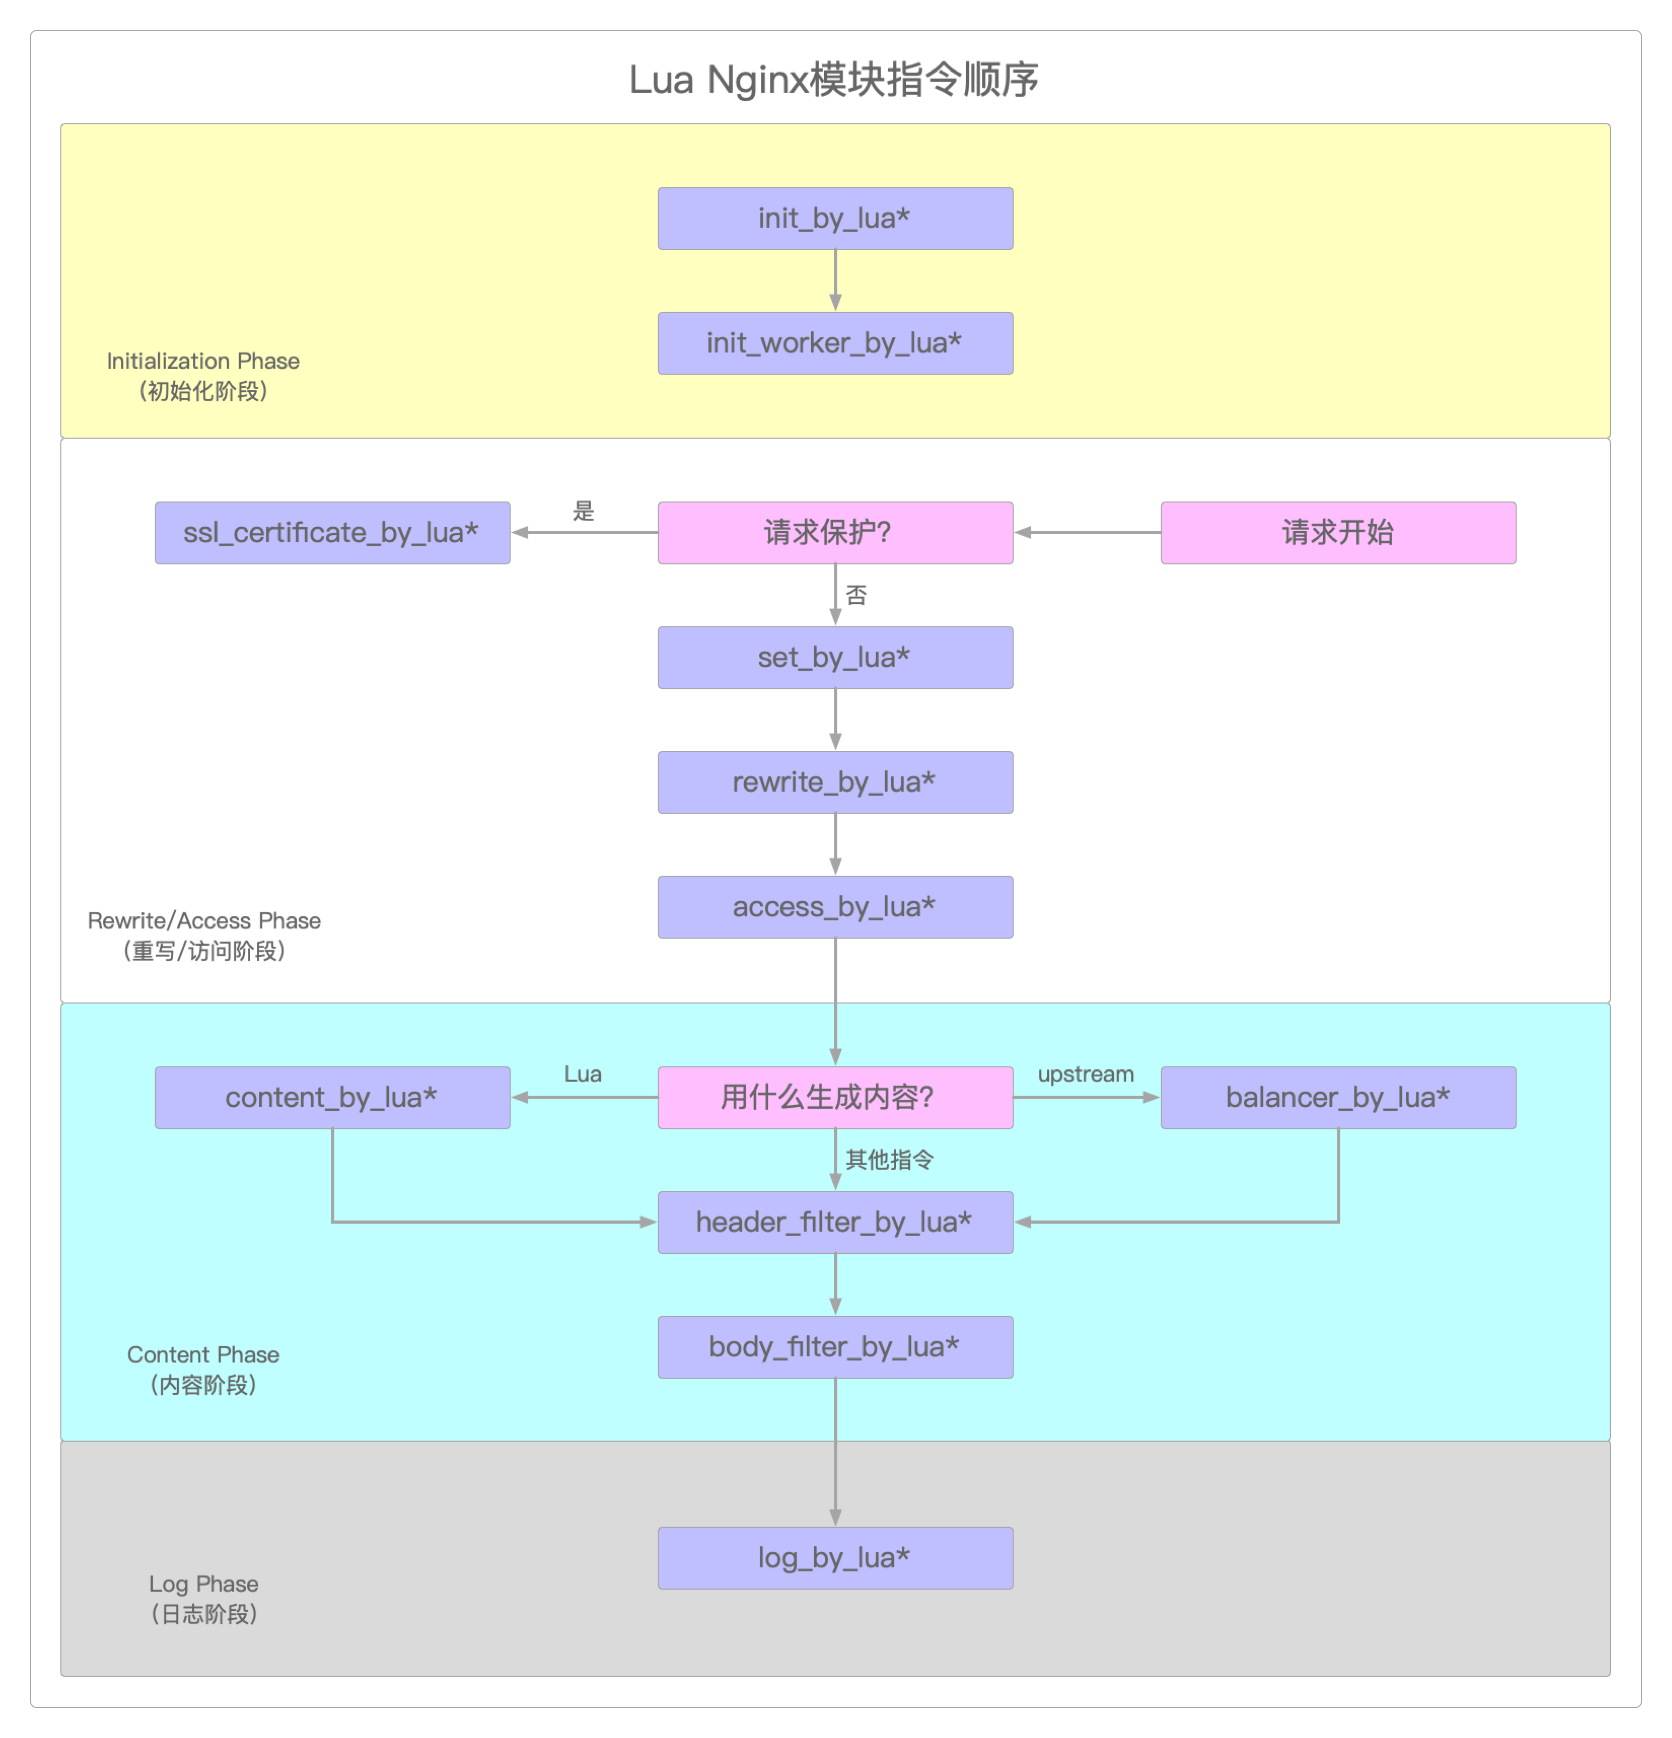
OpenResty仿效Nginx,也把Lua模块指令的执行过程分为了四个阶段
| 顺序 | 名称 | 说明 |
|---|---|---|
| 1 | init_by_lua* | 启动master,将变量复制到worker |
| 2 | init_worker_by_lua* | worker启动 |
| 3 | set_by_lua* | 根据需求执行变量初始化 |
| 4 | rewrite_by_lua* | 实现转发、重定向等功能 |
| 5 | access_by_lua* | 执行访问控制,例如IP黑名单、接口权限过滤、代理转发等 |
| 6 | content_by_lua* | 生成内容 |
| 7 | header_filter_by_lua* | 响应头过滤处理 |
| 8 | body_filter_by_lua* | 内容体过滤处理 |
| 9 | log_by_lua* | 完成日志记录 |
| 指令 | 对应Nginx的处理阶段 | 在Nginx配置文件中的适用范围 | 说明 |
|---|---|---|---|
| init_by_lua init_by_lua_block init_by_lua_file | loading-config | http | Nginx进程加载配置时执行通常用于初始化全局配置/预加载 Lua模块 |
| init_worker_by_lua init_worker_by_lua_block init_worker_by_lua_file | starting-worker | http | 每个Worker进程启动时调用一次,如果Master进程不允许则只会在init_by_lua之后调用通常用于定时拉取配置或数据,或者做后端服务的健康检查 |
| ssl_certificate_by_lua_block ssl_certificate_by_lua_file | right-before-ssl | server | 当Nginx与下游SSL开始握手时,运行指定的Lua代码通常用于对 SSL做特殊处理 |
| set_by_lua set_by_lua_block set_by_lua_file | rewrite | server location | 通常用于设置Nginx变量,实现复杂的赋值逻辑 |
| rewrite_by_lua rewrite_by_lua_block rewrite_by_lua_file | rewrite tail | http server location | 通常用于实现复杂的转发、重定向、缓存等功能 |
| access_by_lua access_by_lua_block access_by_lua_file | access tail | http server location | 通常用于实现IP黑名单、接口权限过滤、代理转发等功能 |
| balancer_by_lua_block balancer_by_lua_file | content | upstream | 负载均衡器,实现动态负载均衡 |
| content_by_lua content_by_lua_block content_by_lua_file | content | location | 内容处理器,用于接收请求并输出响应 |
| header_filter_by_lua header_filter_by_lua_block header_filter_by_lua_file | output-header-filter | http server location | 响应头过滤器,用于设置返回的响应头和Cookie |
| body_filter_by_lua body_filter_by_lua_block body_filter_by_lua_file | output-body-filter | http server location | 内容体过滤器,用于处理响应数据 |
| log_by_lua log_by_lua_block log_by_lua_file | log | http server location | 记录日志 |
阶段测试
通过代码来直观感受OpenResty不同的执行阶段。
修改/usr/local/openresty/nginx/conf/nginx.conf文件。
> vi /usr/local/openresty/nginx/conf/nginx.conf

# 在server中加入如下内容
location /phase {
    default_type 'text/html';
    lua_code_cache off;
    set_by_lua_block $a {
        ngx.log(ngx.ERR, "set_by_lua*")
    }
    rewrite_by_lua_block {
        ngx.log(ngx.ERR, "rewrite_by_lua*")
    }
    access_by_lua_block {
        ngx.log(ngx.ERR, "access_by_lua*")
    }
    content_by_lua_block {
        ngx.log(ngx.ERR, "content_by_lua*")
    }
    header_filter_by_lua_block {
        ngx.log(ngx.ERR, "header_filter_by_lua*")
    }
    body_filter_by_lua_block {
        ngx.log(ngx.ERR, "body_filter_by_lua*")
    }
    log_by_lua_block {
        ngx.log(ngx.ERR, "log_by_lua*")
    }
}在浏览器中访问http://服务器IP:端口号/phase后,error.log中会生成下内容。
2023/06/06 23:05:31 [error] 68145#68145: *1 [lua] set_by_lua(nginx.conf:50):2: set_by_lua*, client: 127.0.0.1, server: localhost, request: "GET /phase HTTP/1.1", host: "localhost"
2023/06/06 23:05:31 [error] 68145#68145: *1 [lua] rewrite_by_lua(nginx.conf:53):2: rewrite_by_lua*, client: 127.0.0.1, server: localhost, request: "GET /phase HTTP/1.1", host: "localhost"
2023/06/06 23:05:31 [error] 68145#68145: *1 [lua] access_by_lua(nginx.conf:56):2: access_by_lua*, client: 127.0.0.1, server: localhost, request: "GET /phase HTTP/1.1", host: "localhost"
2023/06/06 23:05:31 [error] 68145#68145: *1 [lua] content_by_lua(nginx.conf:59):2: content_by_lua*, client: 127.0.0.1, server: localhost, request: "GET /phase HTTP/1.1", host: "localhost"
2023/06/06 23:05:31 [error] 68145#68145: *1 [lua] header_filter_by_lua(nginx.conf:62):2: header_filter_by_lua*, client: 127.0.0.1, server: localhost, request: "GET /phase HTTP/1.1", host: "localhost"
2023/06/06 23:05:31 [error] 68145#68145: *1 [lua] body_filter_by_lua(nginx.conf:65):2: body_filter_by_lua*, client: 127.0.0.1, server: localhost, request: "GET /phase HTTP/1.1", host: "localhost"
2023/06/06 23:05:31 [error] 68145#68145: *1 [lua] log_by_lua(nginx.conf:68):2: log_by_lua* while logging request, client: 127.0.0.1, server: localhost, request: "GET /phase HTTP/1.1", host: "localhost"
阶段指令
下面就分别展示一下各个不同阶段的执行结果。
init_by_lua
init_by_lua在每次Nginx重新加载配置时执行。
先修改/usr/local/openresty/nginx/conf/nginx.conf文件。
> vi /usr/local/openresty/nginx/conf/nginx.conf

# 在http部分加入下面这一行
init_by_lua_file /usr/local/openresty/nginx/conf/lua/init.lua;
# 注释掉原来的include
#include lua.conf;

# 在server中加入下面的内容
location /request {
    default_type 'text/html';
    lua_code_cache on;
    content_by_lua_block {
        -- 每刷新一次页面,count的值就会加1
        -- 如果注释掉 count = count + 1,那么count会一直停留在1不变
        count = count + 1
        ngx.say("global variable ==> ", count, "<br>")
        local global_shared = ngx.shared.global_shared
        global_shared:incr("count", 1)
        ngx.say("global shared ==> ", global_shared:get("count"), "<br>")
	}
}然后在/usr/local/openresty/nginx/conf/lua中新建init.lua文件,并输入如下内容。
> vi /usr/local/openresty/nginx/conf/lua/init.lua

-- 初始化耗时的模块
local mysql = require("resty.mysql")
local redis = require("resty.redis")
-- 全局变量
count = 1
-- 共享全局内存
local global_shared = ngx.shared.global_shared
global_shared:set("count", 1)在浏览器中访问http://服务器IP:9527/request,会发现global variable的值始终都是1,而global shared每刷新一次页面值都会加1,这就是初始化执行后的效果。
init_worker_by_lua
init_worker_by_lua就是用于执行某些定时任务的调度器。
修改/usr/local/openresty/nginx/conf/nginx.conf文件。
> vi /usr/local/openresty/nginx/conf/nginx.conf

# 对之前的init.lua行进行修改,其他不变
init_worker_by_lua_file /usr/local/openresty/nginx/conf/lua/init_worker.lua;然后在/usr/local/openresty/nginx/conf/lua中新建init_worker.lua文件,并输入如下内容。
> vi /usr/local/openresty/nginx/conf/lua/init_worker.lua

local count = 0
local delay = 5
local heartbeat = nil
heartbeat = function (args)
    count = count + 1
    ngx.log(ngx.ERR, "do check ==> ", count)
    local ok, err = ngx.timer.at(delay, heartbeat)
    if not ok then
        ngx.log(ngx.ERR, "failed to startup heartbeat worker...", err)
    end
end
heartbeat()重启Nginx后,就可以通过下面的命令看到输出。
> tail -f /usr/local/openresty/nginx/logs/error.log

[error] 73839#73839: *22 [lua] init_worker.lua:6: do check ==> 2, context: ngx.timer
[error] 73839#73839: *23 [lua] init_worker.lua:6: do check ==> 3, context: ngx.timer
[error] 73839#73839: *24 [lua] init_worker.lua:6: do check ==> 4, context: ngx.timer
[error] 73839#73839: *25 [lua] init_worker.lua:6: do check ==> 5, context: ngx.timer
[error] 73839#73839: *26 [lua] init_worker.lua:6: do check ==> 6, context: ngx.timer

......
set_by_lua
set_by_lua的语法是set_by_lua_file $var lua_file arg1 arg2…;。
先修改/usr/local/openresty/nginx/conf/nginx.conf文件。
> vi /usr/local/openresty/nginx/conf/nginx.conf

# 注释掉这一行
# init_worker_by_lua_file /usr/local/openresty/nginx/conf/lua/init_worker.lua;
# 取消这一行之前的注释
include lua.conf;再修改/usr/local/openresty/nginx/conf/lua.conf文件。
> vi /usr/local/openresty/nginx/conf/lua.conf

server {
    listen 9527;
    server_name _;

    location /setbylua {
        default_type 'text/html';
        lua_code_cache on;
        set_by_lua_file $result conf/lua/set_by_lua.lua;
        echo $result;
    }
}然后在/usr/local/openresty/nginx/conf/lua中新建set_by_lua.lua文件,并输入如下内容。
> vi /usr/local/openresty/nginx/conf/lua/set_by_lua.lua

local uri_args = ngx.req.get_uri_args()
local a = uri_args["a"] or 0
local b = uri_args["b"] or 0
return a + b重启Nginx后,在浏览器中访问http://服务器IP:9527/setbylua?a=1&b=2,就会显示参数a和参数b相加后的结果3。
这是比较简单的栗子,set_by_lua最大的作用是某种程度上能够替代后端服务,实现类似于动态网关的效果。
rewrite_by_lua
rewrite_by_lua用于实现URL重定向。
修改/usr/local/openresty/nginx/conf/lua.conf文件。
> vi /usr/local/openresty/nginx/conf/lua.conf

server {
    listen 9527;
    server_name _;

    location /rewrite1 {
        default_type "text/html";
        lua_code_cache on;
        rewrite_by_lua_file conf/lua/rewrite1.lua;
        echo "no redirect 1";
    }

    location /rewrite2 {
        default_type "text/html";
        lua_code_cache on;
        rewrite_by_lua_file conf/lua/rewrite2.lua;
        echo "no redirect 2";
    }

    location /rewrite3 {
        default_type "text/html";
        lua_code_cache on;
        rewrite_by_lua_file conf/lua/rewrite3.lua;
        echo "no redirect 3";
    }

    location /rewrite4 {
        default_type "text/html";
        lua_code_cache on;
        echo "no redirect 4";
    }
}然后在/usr/local/openresty/nginx/conf/lua中新建3个Lua文件,分别是rewrite1.lua、rewrite2.lua和rewrite3.lua,内容如下。
> vi /usr/local/openresty/nginx/conf/lua/rewrite1.lua
if ngx.req.get_uri_args()["redirect"] == "1" then
    return ngx.redirect("http://www.google.com?redirect=1", 302)
end

> vi /usr/local/openresty/nginx/conf/lua/rewrite2.lua
if ngx.req.get_uri_args()["redirect"] == "0" then
    ngx.req.set_uri("/rewrite3", true);
    ngx.req.set_uri("/rewrite4", false);
    ngx.req.set_uri_args({redirect = 1});
else
    ngx.req.set_uri_args({redirect = 0});
end

> vi /usr/local/openresty/nginx/conf/lua/rewrite3.lua
if ngx.req.get_uri_args()["redirect"] == "1" then
    ngx.req.set_uri("/rewrite4", true);
    ngx.req.set_uri_args({redirect = 0});
end重启Nginx后,在浏览器中分别访问下面的地址查看效果。
http://服务器IP:9527/rewrite1输出
no redirect 1;http://服务器IP:9527/rewrite1redirect=1跳转到http://www.google.com?redirect=1。http://服务器IP:9527/rewrite2?redirect=1输出
no redirect 2;http://服务器IP:9527/rewrite2?redirect=0输出no redirect 3,重定向到/rewrite3。http://服务器IP:9527/rewrite3?redirect=1输出
no redirect 4,重定向到/rewrite4;http://服务器IP:9527/rewrite3?redirect=0输出no redirect 3。http://服务器IP:9527/rewrite4带不带参数都会输出
no redirect 4。
rewrite1.lua中状态码302则代表暂时性转移(Temporarily Moved),如果是状态码301则代表永久性转移(Permanently Moved)。
access_by_lua
access_by_lua通常用于访问控制,比如只允许指定IP访问。
修改/usr/local/openresty/nginx/conf/lua.conf文件,在server中增加如下内容。
> vi /usr/local/openresty/nginx/conf/lua.conf

location /accessbylua {
	default_type "text/html";
	lua_code_cache on;
	access_by_lua_file conf/lua/access_by_lua.lua;
	echo "authorize access";
}然后在/usr/local/openresty/nginx/conf/lua中新建access_by_lua.lua文件,内容如下。
> vi /usr/local/openresty/nginx/conf/lua/access_by_lua.lua

if ngx.var.host ~= "localhost" then
    return ngx.exit(403)
end重启Nginx后,在浏览器中访问http://localhost:9527/accessbylua输出authorize access,而访问http://127.0.0.1:9527/accessbylua则显示403 Forbidden页面。
至于后续header_filter_by_lua、body_filter_by_lua和log_by_lua的使用方式也大同小异。
感谢支持
更多内容,请移步《超级个体》。