
组件应用
基本概念
Source Interceptor可以指定一个或者多个拦截器,让Source按先后顺序依次对采集到的数据进行处理。
Channel Selectors可以指定一个或者多个选择器,让Source可以控制发往多个Channel的数据的策略。
Sink Processors可以指定一个或者多个处理器,让 Sink可以设置发送数据的策略。
首先要说明的是,Event是Flume数据传输的基本单位,也是事务的基本单位。对于文本文件来说,通常一行记录就是一个Event。
Event包含header和body。
header:是一个Map<String, String>类型的键值对集合。body:就是传输的数据内容。
可以在Source中指定header的<key, value>,然后在Channel和Sink中使用它。
Source Interceptor拦截器
Flume已经提供了很多内置的Interceptor类型,包括Timestamp Interceptor、Host Interceptor、static Interceptor、UUID Interceptor、Search and Replace Interceptor和Regex Extractor Interceptor等,它们的具体作用可参考官方文档。
例如,有如下需求。
对采集数据按天按类型分目录存储。
所有的
type数值都遵循驼峰命名规则。
示例数据格式如下。
{"id":"14943445328940974601","uid":"840717325115457536","lat":"53.530598","lnt":"-2.5620373","hots":0,"title":"0","status":"1","topicId":"0","end_time":"1677942692","watch_num":0,"share_num":"1","replay_url":null,"replay_num":0,"start_time":"1677931892","timestamp":1677942692,"type":"order_info"}
{"uid":"861848974414839801","nickname":"mick","usign":"","sex":1,"birthday":"","face":"","big_face":"","email":"abc@qq.com","mobile":"","reg_type":"102","last_login_time":"1677942692","reg_time":"1677942692","last_update_time":"1677942692","status":"5","is_verified":"0","verified_info":"","is_seller":"0","level":1,"exp":0,"anchor_level":0,"anchor_exp":0,"os":"android","timestamp":1677942692,"type":"user_info"}
{"send_id":"834688818270961664","good_id":"223","video_id":"14943443045138661356","gold":"10","timestamp":1494344574,"type":"gift_record"}
实现方式如下。
`Exec Source` --->
                  `Search and Replace Interceptor` --->
                                                       `Regex Extractor Interceptor` --->
                                                                                         `File Channel` --->
`HDFS Sink`先创建Flume的配置文件。
> cd /home/work/flume-1.11.0/conf
> vi use-source-interceptor.conf

# 指定source和sink到channel
a1.sources = r1
a1.channels = c1
a1.sinks = k1


# 配置exec source
a1.sources.r1.type = exec
a1.sources.r1.command = tail -F /var/log/access.log

## 配置Search and Replace Interceptor(多个拦截器按照顺序依次执行)
a1.sources.r1.interceptors = is1 is2 is3 ir4
a1.sources.r1.interceptors.is1.type = search_replace
a1.sources.r1.interceptors.is1.searchPattern = "type":"order_info"
a1.sources.r1.interceptors.is1.replaceString = "type":"orderInfo"

a1.sources.r1.interceptors.is2.type = search_replace
a1.sources.r1.interceptors.is2.searchPattern = "type":"user_info"
a1.sources.r1.interceptors.is2.replaceString = "type":"userInfo"

a1.sources.r1.interceptors.is3.type = search_replace
a1.sources.r1.interceptors.is3.searchPattern = "type":"gift_record"
a1.sources.r1.interceptors.is3.replaceString = "type":"giftRecord"

## 配置Regex Extractor Interceptor
a1.sources.r1.interceptors.ir4.type = regex_extractor
a1.sources.r1.interceptors.ir4.regex = "type":"(\\w+)"
a1.sources.r1.interceptors.ir4.serializers = s1
a1.sources.r1.interceptors.ir4.serializers.s1.name = dataType


# 配置channel
a1.channels.c1.type = file
a1.channels.c1.checkpointDir = /home/work/flume-1.11.0/checkpoint
a1.channels.c1.dataDirs = /home/work/flume-1.11.0/data


# 配置sink
a1.sinks.k1.type = hdfs
a1.sinks.k1.hdfs.path = hdfs://hadoop:9000/%Y-%m-%d/%{dataType}
a1.sinks.k1.hdfs.writeFormat = Text
a1.sinks.k1.hdfs.fileType = DataStream
a1.sinks.k1.hdfs.rollInterval = 3600
a1.sinks.k1.hdfs.rollSize = 134217728
a1.sinks.k1.hdfs.rollCount = 0
a1.sinks.k1.hdfs.useLocalTimeStamp = true

## 统一文件的前缀和后缀
a1.sinks.k1.hdfs.filePrefix = access
a1.sinks.k1.hdfs.fileSuffix = .log


# 绑定source和sink到channel
a1.sources.r1.channels = c1
a1.sinks.k1.channel = c1启动Flume并执行下面的命令。
> cd /home/work/flume-1.11.0/
> nohup ./bin/flume-ng agent -n a1 -c conf -f conf/use-source-interceptor.conf -Dflume.root.logger=INFO,console > /dev/null 2>/home/work/logs/flume-error.log &
# 或者
> nohup ./bin/flume-ng agent --name a1 --conf conf --conf-file conf/use-source-interceptor.conf -Dflume.root.logger=INFO,console > /dev/null 2>/home/work/logs/flume-error.log &
Channel Selectors选择器
Flume也预置了四个Selectors,包括Replicating Channel Selector(默认使用的就是它)、Load Balancing Channel Selector、Multiplexing Channel Selector和Custom Channel Selector,它们的具体作用可参考官方文档。
实例一:分组输出
监听TCP端口的输入,并将数据存储到日志和HDFS。
实现方式如下。
`NetCat Source` --->
                    `Memory Channel` --->
                                         `Logger Sink`
                    `Memory Channel` --->
`HDFS Sink`先创建Flume的配置文件。
> cd /home/work/flume-1.11.0/conf
> vi use-channel-selector1.conf

# 指定source和sink到channel
a1.sources = r1
## 两个channel
a1.channels = c1 c2
## 两个sink
a1.sinks = k1 k2


# 配置exec source
a1.sources.r1.type = netcat
a1.sources.r1.bind = 0.0.0.0
a1.sources.r1.port = 13790

## 配置channel selector(默认就是Replicating Channel Selector)
a1.sources.r1.selector.type = replicating


# 配置channel
## c1
a1.channels.c1.type = memory
a1.channels.c1.capacity = 1000
a1.channels.c1.transactionCapacity = 100

## c2
a1.channels.c2.type = memory
a1.channels.c2.capacity = 1000
a1.channels.c2.transactionCapacity = 100


# 配置sink
## k1
a1.sinks.k1.type = logger

## k2
a1.sinks.k2.type = hdfs
a1.sinks.k2.hdfs.path = hdfs://hadoop:9000/replicating
a1.sinks.k2.hdfs.writeFormat = Text
a1.sinks.k2.hdfs.fileType = DataStream
a1.sinks.k2.hdfs.rollInterval = 3600
a1.sinks.k2.hdfs.rollSize = 134217728
a1.sinks.k2.hdfs.rollCount = 0
a1.sinks.k2.hdfs.useLocalTimeStamp = true

## 统一文件的前缀和后缀
a1.sinks.k2.hdfs.filePrefix = access
a1.sinks.k2.hdfs.fileSuffix = .log


# 绑定source和sink到channel
a1.sources.r1.channels = c1 c2
a1.sinks.k1.channel = c1
a1.sinks.k2.channel = c2启动Flume并执行下面的命令。
> cd /home/work/flume-1.11.0/
> nohup ./bin/flume-ng agent -n a1 -c conf -f conf/use-channel-selector1.conf -Dflume.root.logger=INFO,console > /dev/null 2>/home/work/logs/flume-error.log &
# 或者
> nohup ./bin/flume-ng agent --name a1 --conf conf --conf-file conf/use-channel-selector1.conf -Dflume.root.logger=INFO,console > /dev/null 2>/home/work/logs/flume-error.log &然后通过telnet命令连接Flume,并输入测试数据。
> telnet 172.16.185.176 13790
Trying 172.16.185.176...
Connected to 172.16.185.176.
Escape character is '^]'.
test replicating channel selector
OK此时就可以在控制台和HDFS的hdfs://hadoop:9000/replicating/目录下看到刚才输入的数据。
实例二:按地域分组输出
和前一个需求大致上相同,不一样的是:需要将Replicating Channel Selector改为Multiplexing Channel Selector,并且在Multiplexing Channel Selector之前增加一个Regex Extractor Interceptor拦截器。
实现方式如下。
`NetCat Source` --->
                    `Regex Extractor Interceptor` --->
                                                      `Multiplexing Channel Selector` --->
                                                                                          `Memory Channel` --->
                                                                                                               `Logger Sink`
                                                                                          `Memory Channel` --->
`HDFS Sink`原始数据的格式为任意的JSON文件,其中包含地域类型的字段,例如province或city,然后将数据按照地域分组存储。
先创建Flume的配置文件。
> cd /home/work/flume-1.11.0/conf
> vi use-channel-selector2.conf

# 指定source和sink到channel
a1.sources = r1
## 两个channel
a1.channels = c1 c2
## 两个sink
a1.sinks = k1 k2


# 配置exec source
a1.sources.r1.type = netcat
a1.sources.r1.bind = 0.0.0.0
a1.sources.r1.port = 13790

## 配置source interceptor
a1.sources.r1.interceptors = ir1
a1.sources.r1.interceptors.ir1.type = regex_extractor
a1.sources.r1.interceptors.ir1.regex = "province":"(\\w+)"
a1.sources.r1.interceptors.ir1.serializers = p1
a1.sources.r1.interceptors.ir1.serializers.p1.name = province

## 配置channel selector
a1.sources.r1.selector.type = multiplexing
a1.sources.r1.selector.header = province
a1.sources.r1.selector.mapping.beijing = c1
a1.sources.r1.selector.default = c2


# 配置channel
## c1
a1.channels.c1.type = memory
a1.channels.c1.capacity = 1000
a1.channels.c1.transactionCapacity = 100

## c2
a1.channels.c2.type = memory
a1.channels.c2.capacity = 1000
a1.channels.c2.transactionCapacity = 100


# 配置sink
## k1
a1.sinks.k1.type = logger

## k2
a1.sinks.k2.type = hdfs
a1.sinks.k2.hdfs.path = hdfs://hadoop:9000/multiplexing
a1.sinks.k2.hdfs.writeFormat = Text
a1.sinks.k2.hdfs.fileType = DataStream
a1.sinks.k2.hdfs.rollInterval = 3600
a1.sinks.k2.hdfs.rollSize = 134217728
a1.sinks.k2.hdfs.rollCount = 0
a1.sinks.k2.hdfs.useLocalTimeStamp = true

## 统一文件的前缀和后缀
a1.sinks.k2.hdfs.filePrefix = access
a1.sinks.k2.hdfs.fileSuffix = .log


# 绑定source和sink到channel
a1.sources.r1.channels = c1 c2
a1.sinks.k1.channel = c1
a1.sinks.k2.channel = c2启动Flume并执行下面的命令。
> cd /home/work/flume-1.11.0/
> nohup ./bin/flume-ng agent -n a1 -c conf -f conf/use-channel-selector2.conf -Dflume.root.logger=INFO,console > /dev/null 2>/home/work/logs/flume-error.log &
# 或者
> nohup ./bin/flume-ng agent --name a1 --conf conf --conf-file conf/use-channel-selector2.conf -Dflume.root.logger=INFO,console > /dev/null 2>/home/work/logs/flume-error.log &然后通过telnet命令连接Flume,并输入测试数据。
> telnet 172.16.185.176 13790
Trying 172.16.185.176...
Connected to 172.16.185.176.
Escape character is '^]'.
{"name":"lixingyun", "province":"beijing"}
OK
{"name":"shihao", "province":"hubei"}
OK
{"name":"wanglin", "province":"hubei"}
OK此时可以看到刚才输入的数据{"name":"lixingyun", "province":"beijing"}进入到了Logger控制台,而其余数据则进入到了HDFS。
Sink Processors处理器
Flume同样提供了四个Processors,包括Default Sink Processor、Failover Sink Processor和Load balancing Sink Processor,它们的具体作用可参考官方文档。
除了默认的Default Sink Processor之外,另外两个都需要定义Sink Group。
实例一:负载均衡

先在机器A上创建Flume的配置文件。
> cd /home/work/flume-1.11.0/conf
> vi use-sink-processor1.conf

# 指定source和sink到channel
a1.sources = r1
a1.channels = c1
## 两个sink
a1.sinks = k1 k2


# 配置exec source
a1.sources.r1.type = netcat
a1.sources.r1.bind = 0.0.0.0
a1.sources.r1.port = 13790


# 配置channel
a1.channels.c1.type = memory
a1.channels.c1.capacity = 1000
a1.channels.c1.transactionCapacity = 100


# 配置sink
## k1
a1.sinks.k1.type = avro
a1.sinks.k1.batch-size = 1
a1.sinks.k1.hostname = 172.16.185.174
a1.sinks.k1.port = 13791

## k2
a1.sinks.k2.type = avro
a1.sinks.k2.batch-size = 1
a1.sinks.k2.hostname = 172.16.185.175
a1.sinks.k2.port = 13792

## 配置sink策略
a1.sinkgroups = g1
a1.sinkgroups.g1.sinks = k1 k2
a1.sinkgroups.g1.processor.type = load_balance
a1.sinkgroups.g1.processor.backoff = true
a1.sinkgroups.g1.processor.selector = round_robin


# 绑定source和sink到channel
a1.sources.r1.channels = c1
a1.sinks.k1.channel = c1
a1.sinks.k2.channel = c1接着在机器B上创建Flume的配置文件。
> cd /home/work/flume-1.11.0/conf
> vi use-sink-processor1.conf

# 指定source和sink到channel
a1.sources = r1
a1.channels = c1
a1.sinks = k1


# 配置source
a1.sources.r1.type = avro
a1.sources.r1.bind = 0.0.0.0
a1.sources.r1.port = 13791


# 配置channel
a1.channels.c1.type = memory
a1.channels.c1.capacity = 1000
a1.channels.c1.transactionCapacity = 100


# 配置sink
## k1
a1.sinks.k1.type = hdfs
a1.sinks.k1.hdfs.path = hdfs://hadoop:9000/load-balance
a1.sinks.k1.hdfs.writeFormat = Text
a1.sinks.k1.hdfs.fileType = DataStream
a1.sinks.k1.hdfs.rollInterval = 3600
a1.sinks.k1.hdfs.rollSize = 134217728
a1.sinks.k1.hdfs.rollCount = 0
a1.sinks.k1.hdfs.useLocalTimeStamp = true

## 统一文件的前缀和后缀
a1.sinks.k1.hdfs.filePrefix = b-
a1.sinks.k1.hdfs.fileSuffix = .log


# 绑定source和sink到channel
a1.sources.r1.channels = c1
a1.sinks.k1.channel = c1最后在机器C上创建Flume的配置文件。
> cd /home/work/flume-1.11.0/conf
> vi use-sink-processor1.conf

# 指定source和sink到channel
a1.sources = r1
a1.channels = c1
a1.sinks = k1


# 配置source
a1.sources.r1.type = avro
a1.sources.r1.bind = 0.0.0.0
a1.sources.r1.port = 13792


# 配置channel
a1.channels.c1.type = memory
a1.channels.c1.capacity = 1000
a1.channels.c1.transactionCapacity = 100


# 配置sink
## k1
a1.sinks.k1.type = hdfs
a1.sinks.k1.hdfs.path = hdfs://hadoop:9000/load-balance
a1.sinks.k1.hdfs.writeFormat = Text
a1.sinks.k1.hdfs.fileType = DataStream
a1.sinks.k1.hdfs.rollInterval = 3600
a1.sinks.k1.hdfs.rollSize = 134217728
a1.sinks.k1.hdfs.rollCount = 0
a1.sinks.k1.hdfs.useLocalTimeStamp = true

## 统一文件的前缀和后缀
a1.sinks.k1.hdfs.filePrefix = c-
a1.sinks.k1.hdfs.fileSuffix = .log


# 绑定source和sink到channel
a1.sources.r1.channels = c1
a1.sinks.k1.channel = c1因为它们的配置文件名都是相同的,所以执行的Flume命令也相同。
先启动机器B和机器C,然后再启动机器A。
> cd /home/work/flume-1.11.0/
> nohup ./bin/flume-ng agent -n a1 -c conf -f conf/use-sink-processor1.conf -Dflume.root.logger=INFO,console > /dev/null 2>/home/work/logs/flume-error.log &
# 或者
> nohup ./bin/flume-ng agent --name a1 --conf conf --conf-file conf/use-sink-processor1.conf -Dflume.root.logger=INFO,console > /dev/null 2>/home/work/logs/flume-error.log &然后在机器A上通过telnet命令连接Flume,并输入测试数据。
> telnet 172.16.185.176 13790
Trying 172.16.185.176...
Connected to 172.16.185.176.
Escape character is '^]'.
test load balance1
OK
test load balance2
OK
test load balance3
OK
test load balance4
OK此时就可以在HDFS的目录hdfs://hadoop:9000/load-balance中通过文件的前缀看到,数据按照每次1条的频率,轮流地被从机器B和机器C发送过来。
实例二:故障转移
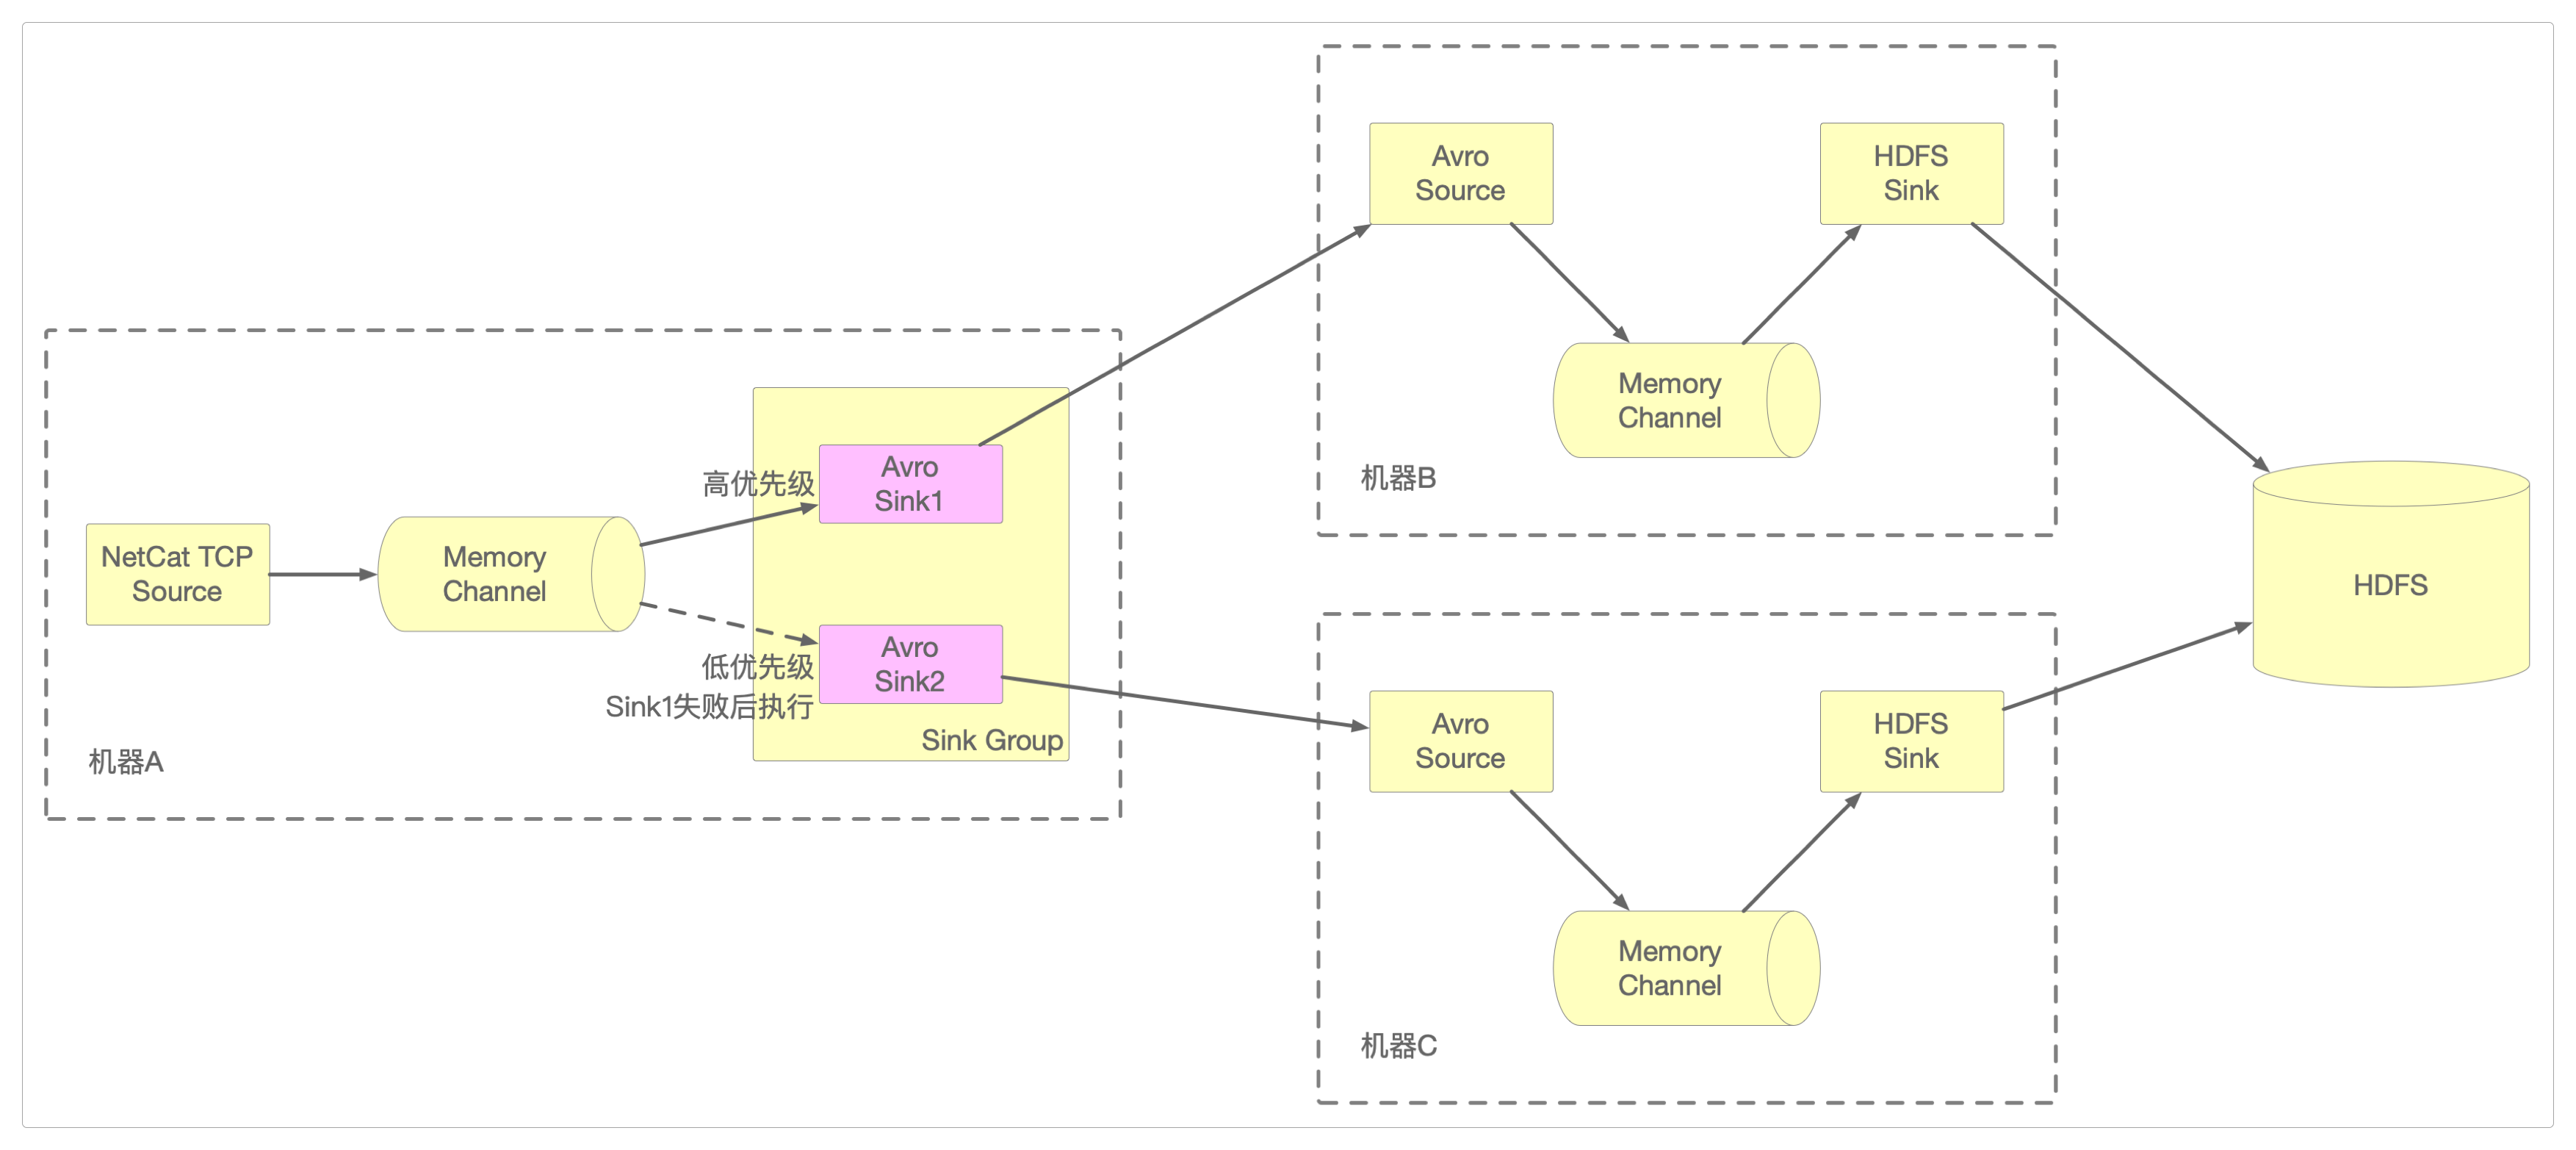
除了机器A的Flume配置文件需要修改外,机器B和机器C上的配置文件只需要将HDFS中的目录名改成/failover就行。
修改机器A上的Flume配置文件。
> cd /home/work/flume-1.11.0/conf
> vi use-sink-processor2.conf

# 指定source和sink到channel
a1.sources = r1
a1.channels = c1
## 两个sink
a1.sinks = k1 k2


# 配置exec source
a1.sources.r1.type = netcat
a1.sources.r1.bind = 0.0.0.0
a1.sources.r1.port = 13790


# 配置channel
a1.channels.c1.type = memory
a1.channels.c1.capacity = 1000
a1.channels.c1.transactionCapacity = 100


# 配置sink
## k1
a1.sinks.k1.type = avro
a1.sinks.k1.batch-size = 1
a1.sinks.k1.hostname = 172.16.185.174
a1.sinks.k1.port = 13791

## k2
a1.sinks.k2.type = avro
a1.sinks.k2.batch-size = 1
a1.sinks.k2.hostname = 172.16.185.175
a1.sinks.k2.port = 13792

## 配置sink策略
a1.sinkgroups = g1
a1.sinkgroups.g1.sinks = k1 k2
a1.sinkgroups.g1.processor.type = failover
a1.sinkgroups.g1.processor.priority.k1 = 10
a1.sinkgroups.g1.processor.priority.k2 = 5
a1.sinkgroups.g1.processor.maxpenalty = 10000


# 绑定source和sink到channel
a1.sources.r1.channels = c1
a1.sinks.k1.channel = c1
a1.sinks.k2.channel = c1先启动机器B和机器C。
> cd /home/work/flume-1.11.0/
> nohup ./bin/flume-ng agent -n a1 -c conf -f conf/use-sink-processor1.conf -Dflume.root.logger=INFO,console > /dev/null 2>/home/work/logs/flume-error.log &
# 或者
> nohup ./bin/flume-ng agent --name a1 --conf conf --conf-file conf/use-sink-processor1.conf -Dflume.root.logger=INFO,console > /dev/null 2>/home/work/logs/flume-error.log &然后再启动机器A。
> cd /home/work/flume-1.11.0/
> nohup ./bin/flume-ng agent -n a1 -c conf -f conf/use-sink-processor2.conf -Dflume.root.logger=INFO,console > /dev/null 2>/home/work/logs/flume-error.log &
# 或者
> nohup ./bin/flume-ng agent --name a1 --conf conf --conf-file conf/use-sink-processor2.conf -Dflume.root.logger=INFO,console > /dev/null 2>/home/work/logs/flume-error.log &在机器A上通过telnet命令连接Flume,并输入测试数据。
> telnet 172.16.185.176 13790
Trying 172.16.185.176...
Connected to 172.16.185.176.
Escape character is '^]'.
test failover1
OK
test failover2
OK
test failover3
OK从HDFS上保存的数据可以看到以下事实。
优先级高的
Sink,也就是k1保存了数据,而没有接收到k2发送的数据。此时将优先级高的
k1所在的机器B关掉,再输入数据后,就能看到HDFS此时接收并保存的是k2发送过来的数据。如果恢复
机器B的运行,由于k1设定的优先级高于k2,所以如果再输入数据的话,还是会优先由k1而不是k2接收并处理数据。
自定义组件
除了三大核心组件Source、Channel、Sink,以及三大高级组件Source Interceptor、Channel Selectors、Sink Processors以外,Flume还支持自定义核心组件和自定义高级组件。
编写完自定义组件的代码后,就可以通过以下方式来调用。
当前不支持自定义
Source Interceptor组件。当前不支持自定义
Sink Processor组件。
下面是官方给出的自定义组件的实例。
自定义
Channel代码实例(无)。
感谢支持
更多内容,请移步《超级个体》。