
数据上传至HDFS
原创大约 3 分钟
上传本地文件
首先创建Flume的配置文件。
> cd /home/work/flume-1.11.0/conf
> vi upload-file-to-hdfs.conf

# 指定source和sink到channel
b1.sources = r1
b1.channels = c1
b1.sinks = k1

# 配置source
b1.sources.r1.type = spoolDir
b1.sources.r1.spoolDir = /home/work/flume-1.11.0/test

# 配置channel
b1.channels.c1.type = file
b1.channels.c1.checkpointDir = /home/work/flume-1.11.0/checkpoint
b1.channels.c1.dataDirs = /home/work/flume-1.11.0/data

# 配置sink
b1.sinks.k1.type = hdfs
b1.sinks.k1.hdfs.path = hdfs://hadoop:9000/flume/events
b1.sinks.k1.hdfs.filePrefix = fe-
b1.sinks.k1.hdfs.writeFormat = Text
b1.sinks.k1.hdfs.fileType = DataStream
b1.sinks.k1.hdfs.rollInterval = 3600
b1.sinks.k1.hdfs.rollSize = 134217728
b1.sinks.k1.hdfs.rollCount = 0

# 绑定source和sink到channel
b1.sources.r1.channels = c1
b1.sinks.k1.channel = c1启动Flume并执行下面的命令。
> cd /home/work/flume-1.11.0/
> nohup ./bin/flume-ng agent -n b1 -c conf -f conf/upload-file-to-hdfs.conf -Dflume.root.logger=INFO,console > /dev/null 2>/home/work/logs/flume-error.log &
# 或者
> nohup ./bin/flume-ng agent --name b1 --conf conf --conf-file conf/upload-file-to-hdfs.conf -Dflume.root.logger=INFO,console > /dev/null 2>/home/work/logs/flume-error.log &之后再执行下面的命令就可以看到文件夹中的内容被存储到HDFS中了。
> hdfs dfs -ls -R /
-rw-r--r--   1 root supergroup       1361 2024-xx-xx 21:17 /README.txt
drwxrwxrwx   - root supergroup          0 2024-xx-xx 23:11 /flume
drwxrwxrwx   - root supergroup          0 2024-xx-xx 23:11 /flume/events
-rw-r--r-- 1 root supergroup 4238 2024-xx-xx 23:11 /flume/events/fe-.1677942692.tmp执行HDFS的cat命令查看上传的文件内容。
> hdfs dfs -cat /flume/events/fe-.1677942692.tmp

# Licensed to the Apache Software Foundation (ASF) under one
# or more contributor license agreements.  See the NOTICE file
# distributed with this work for additional information
# regarding copyright ownership.  The ASF licenses this file
# to you under the Apache License, Version 2.0 (the
# "License"); you may not use this file except in compliance
# with the License.  You may obtain a copy of the License at
......而且,所有已经读取过的文件,都会被Flume加上.COMPLETED后缀,只要不人为干预,就不会出现重复读取的问题。
上传网站日志
上传网站日志需求如下。
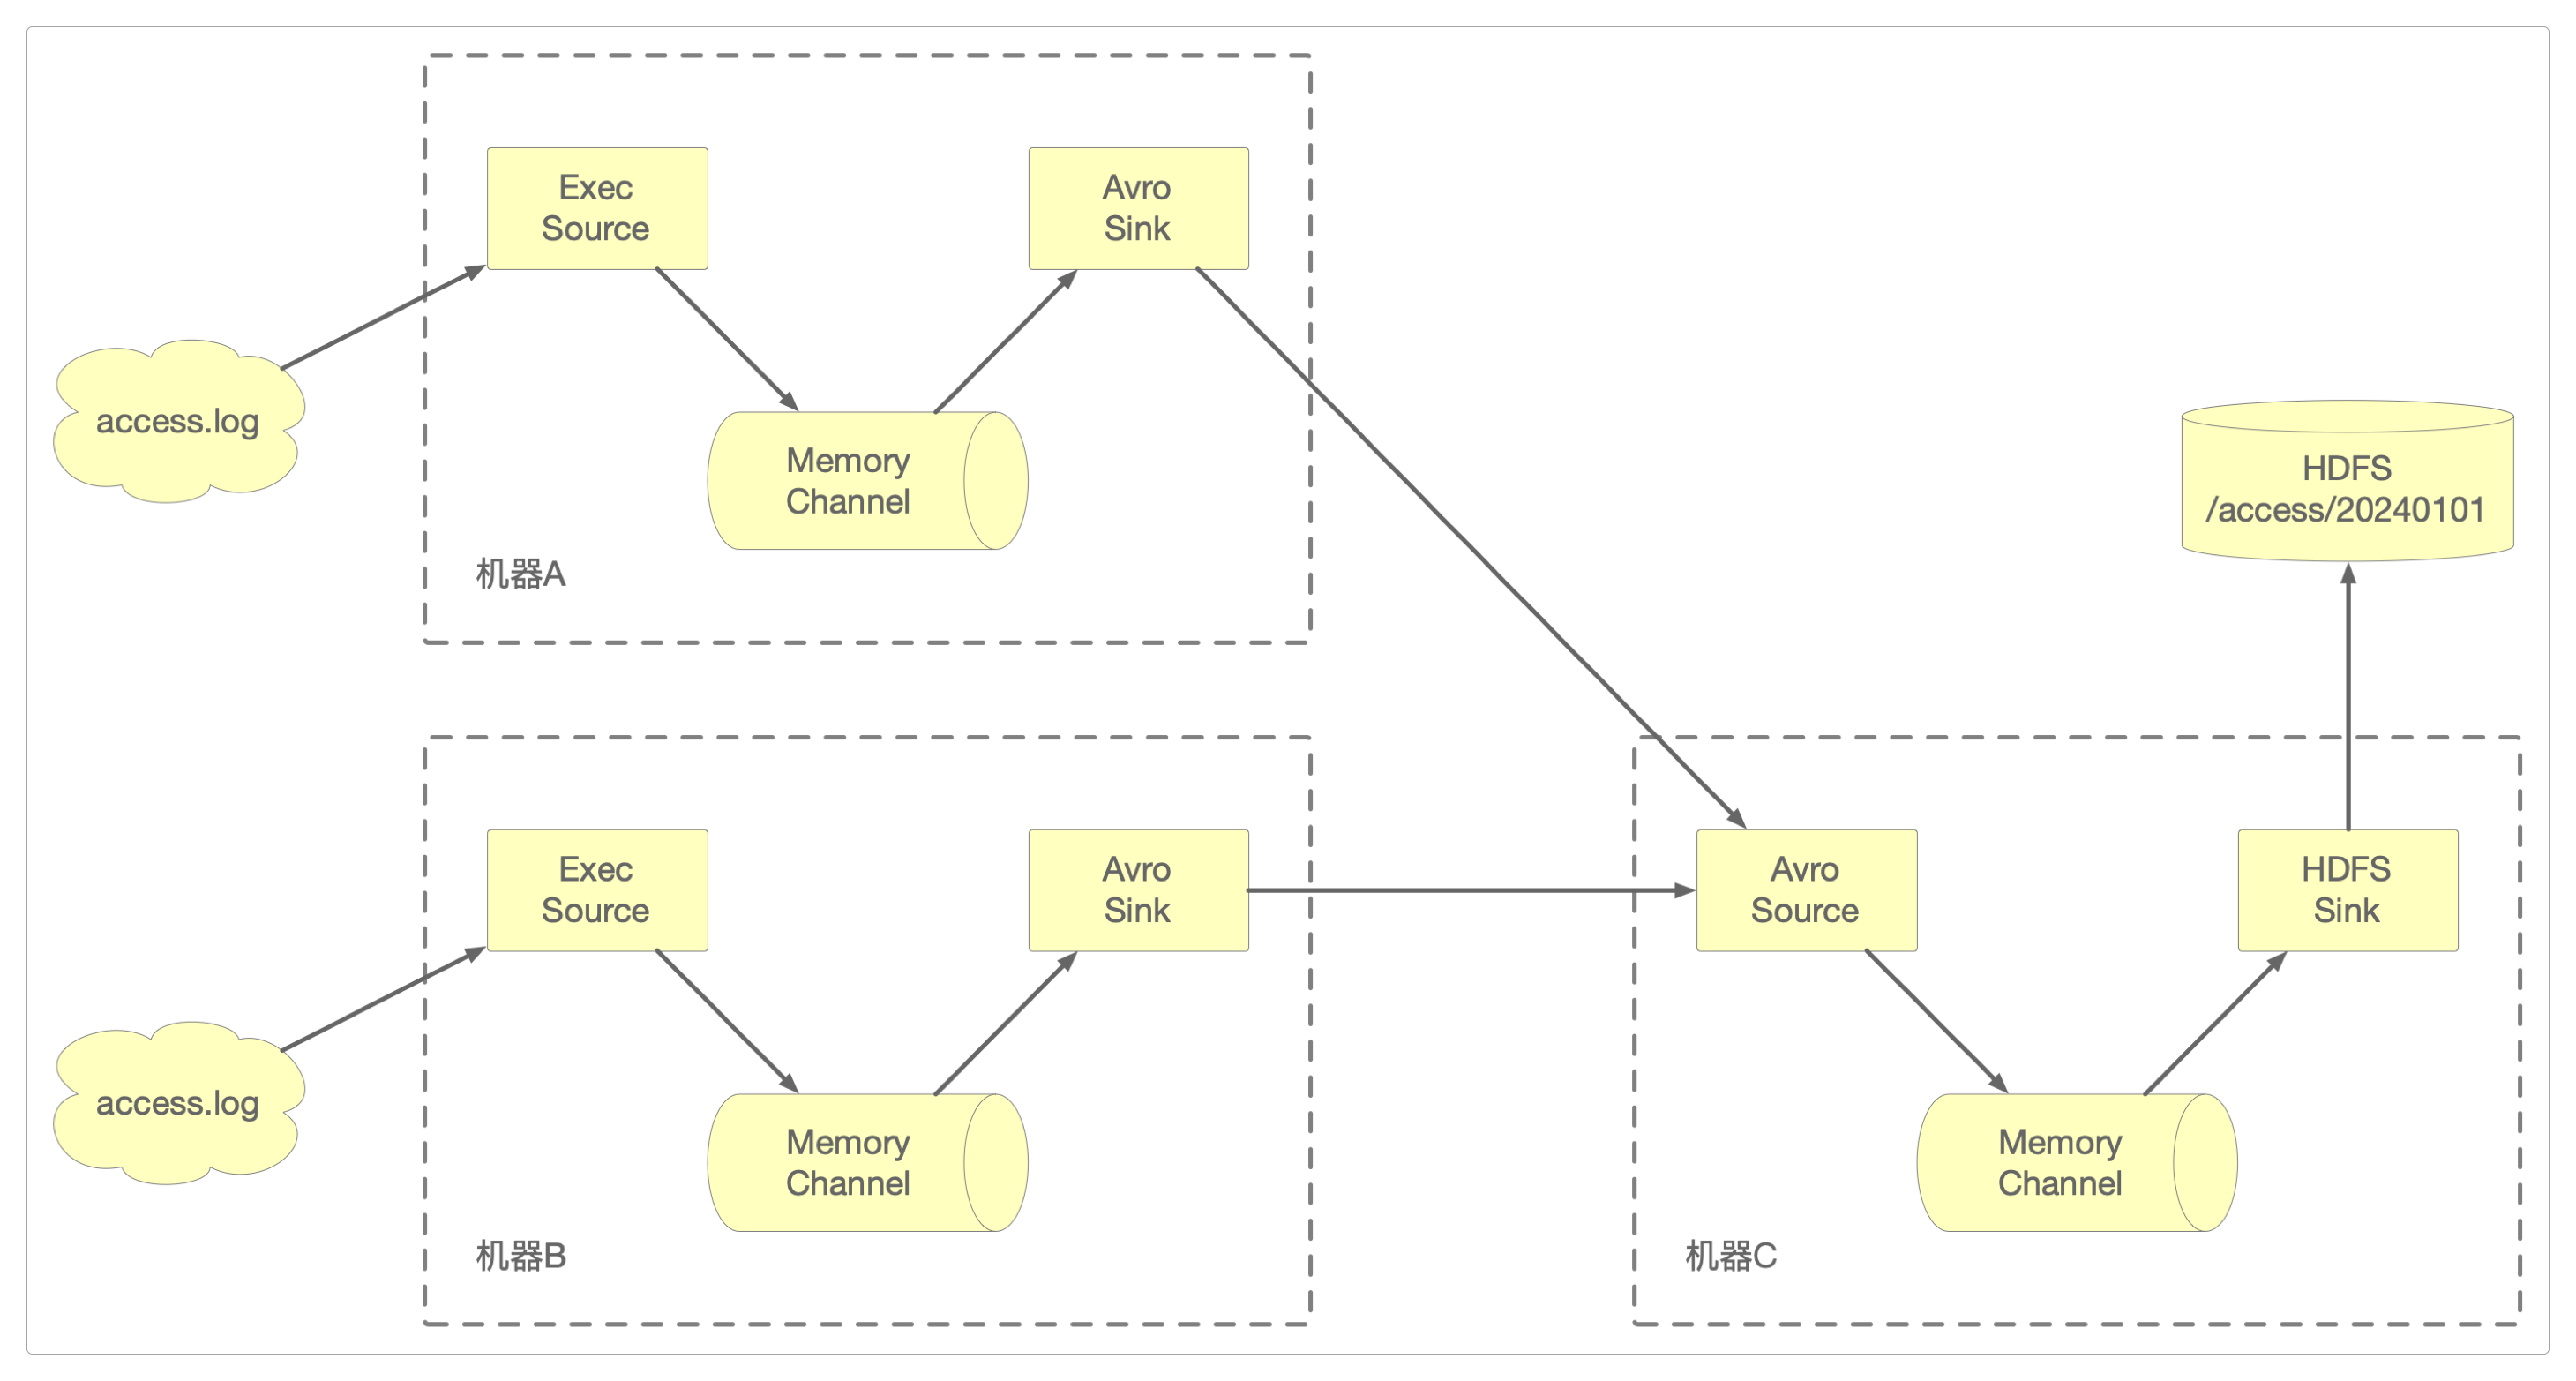
分别在机器A和机器B上安装Flume,并编写如下配置文件。
> cd /home/work/flume-1.11.0/conf
# 通过文件名前缀区分不同的机器:a-upload-log-to-avro.conf或者b-upload-log-to-avro.conf
> vi a-upload-log-to-avro.conf

# 指定source和sink到channel
a1.sources = r1
a1.channels = c1
a1.sinks = k1

# 配置source
a1.sources.r1.type = exec
a1.sources.r1.command = tail -F /var/log/access.log

# 配置channel
a1.channels.c1.type = memory
a1.channels.c1.capacity = 1000
a1.channels.c1.transactionCapacity = 100

# 配置sink
a1.sinks.k1.hostname = 172.16.185.176
a1.sinks.k1.port = 13791

# 绑定source和sink到channel
a1.sources.r1.channels = c1
a1.sinks.k1.channel = c1接着在机器C上安装Flume,并编写如下配置文件。
> cd /home/work/flume-1.11.0/conf
> vi upload-log-to-hdfs.conf

# 指定source和sink到channel
a1.sources = r1
a1.channels = c1
a1.sinks = k1

# 配置source
a1.sources.r1.type = avro
a1.sources.r1.bind = 0.0.0.0
a1.sources.r1.port = 13791

# 配置channel
a1.channels.c1.type = memory
a1.channels.c1.capacity = 1000
a1.channels.c1.transactionCapacity = 100

# 配置sink
a1.sinks.k1.type = hdfs
a1.sinks.k1.hdfs.path = hdfs://hadoop:9000/access/%Y-%m-%d
a1.sinks.k1.hdfs.filePrefix = access
a1.sinks.k1.hdfs.writeFormat = Text
a1.sinks.k1.hdfs.fileType = DataStream
a1.sinks.k1.hdfs.rollInterval = 3600
a1.sinks.k1.hdfs.rollSize = 134217728
a1.sinks.k1.hdfs.rollCount = 0
a1.sinks.k1.hdfs.useLocalTimeStamp = true

# 绑定source和sink到channel
a1.sources.r1.channels = c1
a1.sinks.k1.channel = c1
准备好配置文件后,需要通过一个脚本文件来模拟生成的日志数据。
> cd /home/work/flume-1.11.0/
> vi generateLog.sh
#!/bin/bash

while [ "1" = "1" ]
do
    # 获取当前时间戳
    current_timestamp = `data +%s`
    # 获取当前主机名
    current_hostname = `hostname`
    echo ${current_hostname}_${current_timestamp} >> /var/log/access.log
    # 暂停1秒
    sleep 1
done
执行脚本文件。
> cd /home/work/flume-1.11.0/
> sh -x ./generateLog.sh然后,先启动机器C上的Flume。
> cd /home/work/flume-1.11.0/
> nohup ./bin/flume-ng agent -n a1 -c conf -f conf/upload-log-to-hdfs.conf -Dflume.root.logger=INFO,console > /dev/null 2>/home/work/logs/flume-error.log &再分别启动机器A和机器B上的Flume。
# 启动机器A中的Flume
> cd /home/work/flume-1.11.0/
> nohup ./bin/flume-ng agent -n a1 -c conf -f conf/a-upload-log-to-avro.conf -Dflume.root.logger=INFO,console > /dev/null 2>/home/work/logs/flume-error.log &

# 启动机器B中的Flume
> cd /home/work/flume-1.11.0/
> nohup ./bin/flume-ng agent -n a1 -c conf -f conf/b-upload-log-to-avro.conf -Dflume.root.logger=INFO,console > /dev/null 2>/home/work/logs/flume-error.log &
注意,停止服务的顺序和启动服务的顺序相反。
感谢支持
更多内容,请移步《超级个体》。